Thursday, October 9, 2014

Southern Pacific GP40-2 Project

Welcome to another project that will be worked on in a college dorm!

This project will be making a prototypical(ish) HO model of the GP40-2 Southern Pacific had in there fleet. This will have the "L-window, SP Light package front/back, and other items that were iconic to the SP
The shell was an Athearn Bluebox Early GP40. What I have done already is remove the radiator grill, it will be replaced with Cannon and Company  part RS-1402.

Next I will also be replacing the Cab, Cab base, and Nose with Cannon and Company parts.

Since this is my first real locomotive detailing/modeling project I will be trying my hand at replacing just about everything possible within reason and budget.
The parts I have now I was able to get at a local hobby shop, the rest are on the way direct from cannon and company.

Seen here is the EMD GP fuel detail kit, new fans, the new cab, and new cab base (SP Split doors on the way)


Other parts on the way are,
2103 EMD Dash 2 Anticlimber
1805 Extended Range Dynamic Doors
1355 Dust Bin - GP40-2                     
1952 Turbo Hatch - 40 Series and Dash 2 
1301 Inertial Filter Screen - Late Dash 2  | GPs 
2001 Tread & Steps Athearn GP38-2 and | GP40-2                                                                  
1203 SP Split Equipment Doors
1104 Short Hood - 88 Inch
1853 Thinwall 48 Inch Dynamic Brake Fan
2052 Step Lights 
2155 EMD Air Reservoirs

Thursday, July 31, 2014

A Tar roof Out of Masking Tape and Paint


Work continues, and this time it is on an often neglected area of the structure everyone sees, the roof! The latest development is the addition of some roofing detail, like the tar roof, concrete facade painting,  and some vents from the Walthers Rooftop Details kit. 

To make the tar roof I used off-white masking tape, cutting it into small rectangles. I overlapped the tape tiles some and painted with craft store acrylic paint. The different colors are the result of different mixes of black and white. Then I used a black fine point sharpie to draw the black lines around each of the tiles edges. The roof turned out very nice in my humble opinion. The tape really gave it good texture. I decided to make it look like each roof section was replaced/laid at a different time, hence the three different shades of black. 


Under the tape is styrene that I painted on both sides with a rattle can. The inside is gray and the top black. Painting the top wasn't really necessary since I planned on adding the tape roof anyway. But there being no harm in extra black paint, I gave it a good coat of black. It further blocks any light coming thru, also it hides any areas I may have missed when laying down the tape. 

The only little thing I don't like is that the sharpie lines give off a red tint. It is more obvious the darker the tape was painted. Im planning to weather the roof further, and add dull coat which will hopefully solve the issue. 


As far as this project has come….it still has a long way to go just to be considered as "base layer complete". Meaning everything done with the exception of adding details, decals and the like.

For example I still need to finish the base coat in the loading dock interior. Then paint the I-beams and columns (my guess is a red color or something? Still uncertain).  Not to mention I still need to install interior and exterior lighting.

Thursday, July 17, 2014

Structural Integrity and Paint.

 It has been a little bit of time since I have last updated all of you. But yes, I have been working everyday for a few hours on this structure.

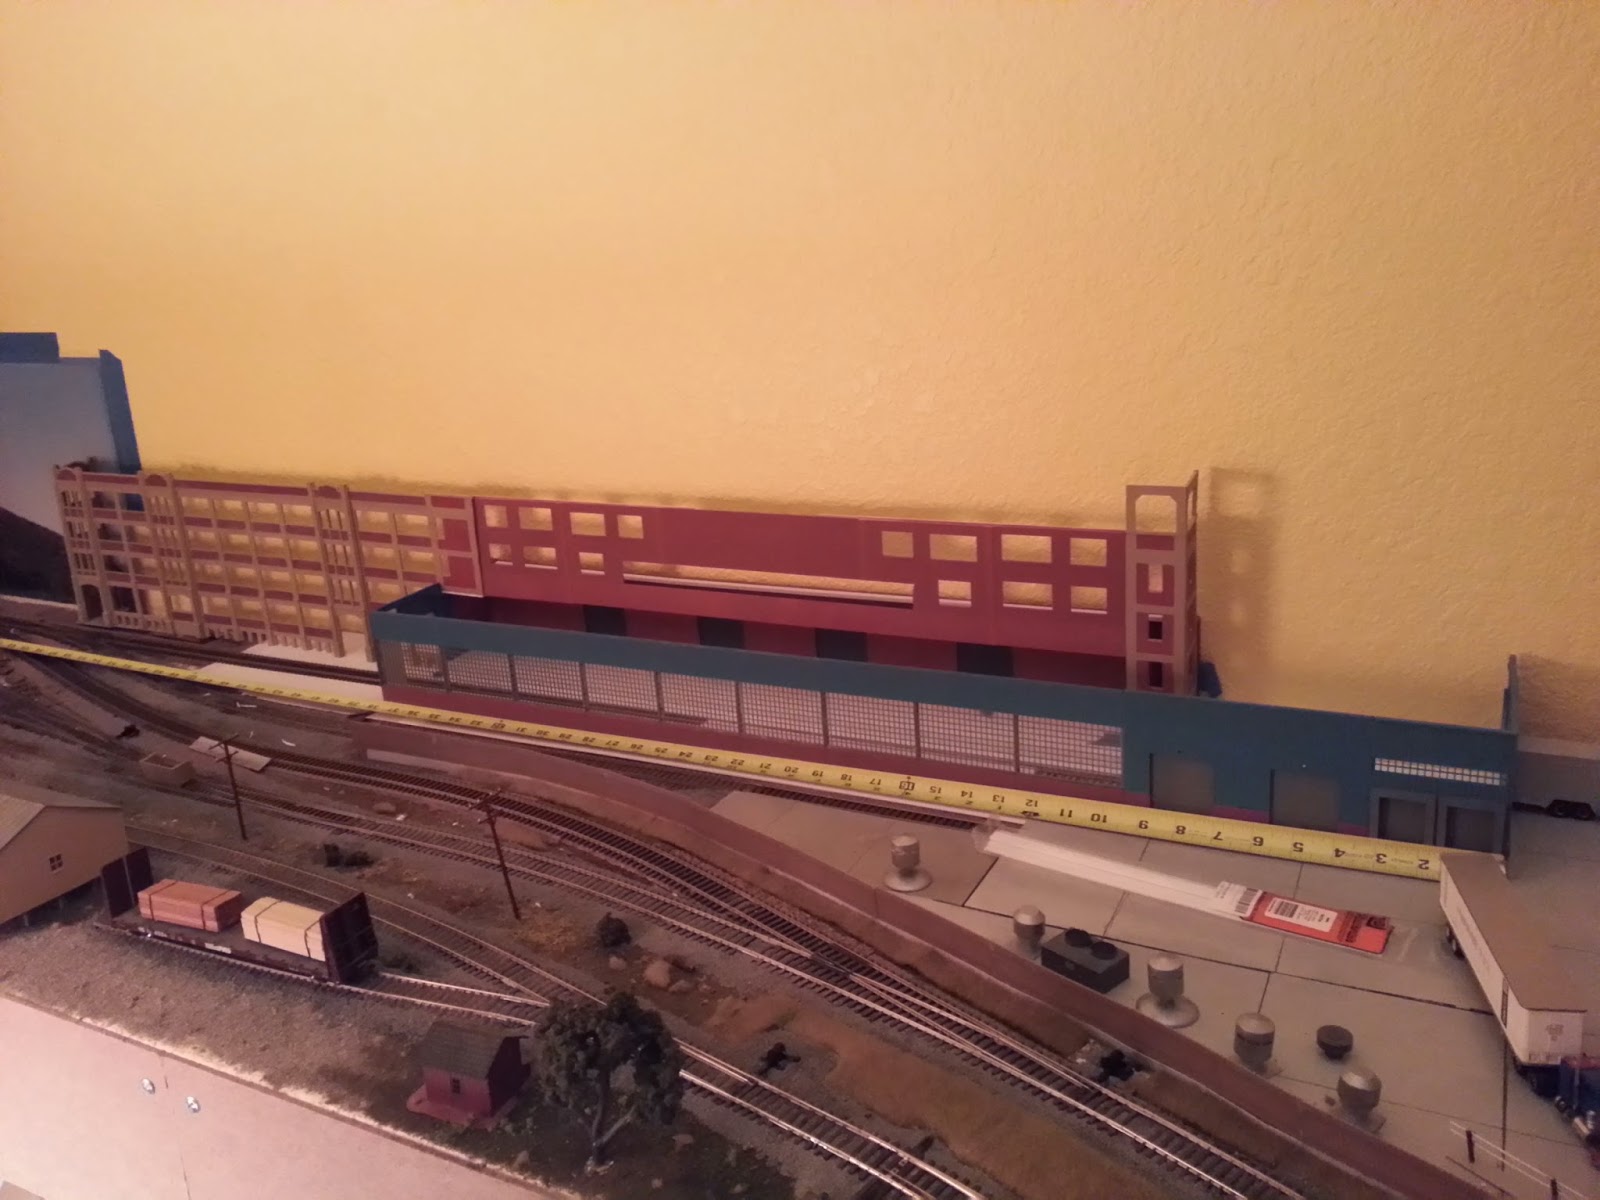
The window frames are in! Mostly. There are a few openings at the bottom that I still need to decide, as the kit allows for a few options. I can make them a solid brick, or a window section with brick like the rest of the structure, or even a loading dock! Im doubting that I will put in a loading dock in all four openings, only in the right side that is next to the loading dock area.
The left side of the building, also has window frames and painted brick with aged concrete. It is still a little awkward looking. The windows are not even one each half. But each half is a mirror of each other.

In the back, on top and bottom is styrene to reinforce and strengthen it.


 For the roof section on the right side of the second story. I devised a tab locking section to hold the roof straight with the wall. There is a gap between two styrene strips that are used to reinforce the wall. I glued some square beams to on the underside of the roof to fit right into the grooves. I still need to construct/frame the back to it will stay up.
 Here is an inside view of the loading dock. The styrene was painted with Model Master Concrete colored acrylic paint. Under the entire structure is a .010" thick. styrene that holds everything in place; Glued to that is the loading dock and .040 styrene. I made cuts to allow the track to fit in, then on top is the painted styrene which is also .040 thick. The white I-Beam is glued onto the wall/window sections, the roof just rests on top of it. Still am deciding how I should paint the ceiling and what color. 
From the top with the loading dock area roof off. There are styrene rectangle beams used for a few reasons on top the back end that buts against the second story. I offset them so the roof sections now fit in a certain way. I know the roof will probably be black, but here again, I am currently not sure if the beams will blend in with the roof or with the aged concrete. 


For the far side where the truck docks are located I scratch built this corner-piece to hold up the roof section. Since the story is that the peterson tool specialty is an add on my story for this little piece is for some "seismic retrofitting" on the older section. I may or may not put in some angled crossbeams to really simulate structural reinforcement. 


The section will also remain as a separate piece front the structure (okay at least for now). I can't glue it to the ground because of how I remove the second story that is over the loading lock area, that part slides out. The little piece is held into place by the concrete ground styrene, it drops into a channel. 


Speaking of the wall section sliding, here is picture proof of how its rigged. An I-beam installed for reinforcement extends past the end of the wall; on the connecting wall is a perfectly sized hole for the beam to slide in. I may add second one just to be fool-proof. But for now this is working swell. 


It might be a little hard to see, but the American Tool Supplier wall actually drops and locks into place. I cut a small notch here and there so it drops in perfectly and is held at a 90 degree angle (more or less) on all sides. Off on the right side you can see the left side wall section sitting on the loading dock with the I-Beam protruding past the side. 

Last for this post is some of the back structuring I have scratch-built primarily to hold up the roof on the Left wall section. Unlike the rest of the roof sections on the right side, the left side roof was constructed using the roof that came with the Walthers kit instead of plain white styrene. Although It will likely never be seen, I plan to detail the brick on top facing the wall just as I am the rest of the building, even touching up some areas. 

Tuesday, July 8, 2014

Back Home for a Test Fitting!

Went home for the fourth of July weekend decided it would be a good time to test fit the structure to see if I have actually been working off of the right measurements. Overall I say everything fits just about prefect. As a bonus I cut some styrene to size for the concrete floor the tracks run in

The overall length of the structure is about 5' 2" from all to wall. It will be made up of three sections, like I said earlier. I will be more description in another post.

One item that may be a tad more complicated is the base for the wall section that isn't the loading dock area.


 As a bonus I cut a patch in the styrene base for the tracks to run in on an used .010 styrene under that to hold everything together. Then I added some styrene on the tops of the ties for the concrete floor. Making it appear that the tracks are cemented in.


Already I think this view from inside the main door is fairly nifty. It will of course look much better with all of the concrete painted.


Wednesday, July 2, 2014

Loading Area Progress.

Work continues! Painting assembling and glueing. 

Got the bottom brick painted; Looks better then I expected. My co-worker actually suggested it and I decided to give it a try. Next I will want to paint the concrete facade on the second story. Followed by adding of the window frames. 


Another addition this week is the loading dock platform. I used 1/2" Plastruct I-Beams and .040 sheet styrene. It will attach to the back brick wall - which has also been painted - and will be a seperate "section" along with the second story. The other sections planned are the front Peterson Tool Specialties and the non scratch build section of the American Tools building. Again the idea is to have the entire building be made of about three sections that fit together. 


Wednesday, June 25, 2014

Taking Shape

Here is a look at progress on the structure. I have most of the layout/footprint figured out for the structure.


My estimation is that the structure is about six feet (6'). I currently thinking on how I am going to put it together, I do not want the entire thing to be one piece structure. Im thinking maybe four pieces if not more. 

For the rest of construction to happen I am going to need styrene sheets, square beams, I-beams, etc. There will be a complete interior for the rail loading/unloading sections. 


Next week I hope to paint the mostly scratch built second story thats just behind the new prefab structure. The window sections are from the American Hardware Kit (which is also the River City Textiles Background Building Kit); I cut the wall into four + sections and added a Walther's brick wall sheet in the middle. In between each section going vertically is white styrene strips that will be painted the aged concrete color. The bottom of all the sections the tan/cream color plastic, which is from the Lakeville Warehouse Kit, will also be painted the same concrete color. I wanted it to at least sort of tie-in/blend-in with the rest of the American Hardware Supply Kit. The white part in the middle is going to be the buildings air system intake/or exhaust. I might try to find some brass mesh, or other detail parts for it.


For the interior loading dock I plan in "indenting" the entire thing. Sort of like you see here. The red section in the very back are the doors while the second story will be flush with the rest of the structure. I do plan on having the elevated loading dock forward to that line as well.


It has come a long way in about two or three weeks, still has a long way to go. Which is fine. :)

Wednesday, June 18, 2014

Background Kit-bash

I sprayed on the concrete coat (Model Master Aged Concrete) yesterday evening and overall it turned out okay. A few areas are less perfect then others, as there are some blemishes. Overall it appears that some weathering will cover up the overspray/areas that didn't turnout perfectly.  It took the entire 1/2 oz bottle to paint these six wall sections. I still have the wall sections that will go behind the Peterson Tool Specialties. This however are mostly going to be brick with concrete window sills. Up next I think I will work on the outside exterior of the Peterson Tool Specialties, and work on the foot print of the structures.

For the American Hardware Kit I still need to paint the window frames and the foundation. Im thinking about laying it out like is is below. Im just worried about how big the structure will end up being and displacing the other structures I already have.


Tuesday, June 17, 2014

Third Time is the Charm?

Hello again,
So maybe I will actually start this thing up as little add on to my YouTube videos.

My latest project involves a newly purchased airbrush a Paasche H series Single Action Airbrush, a newly purchased Iwata Smart-Jet air compressor and two new nondescript portable spray booths all of which are set up in my dorm room as I live on campus all summer for work.


Airbrushing is something I have always to get into. Up until now I have been using spray cans from the local hardware store, as you can imagine they come in a limited number of unalterable colors. But it was still better then unpainted plastic right of the box. The aim is to accomplish, like many people, is realism. More specifically I want my structures to look really cool and make people go "wow!" as they take time to look around and see whats going on inside. As stated in one of my videos, my focus is not prototypic as much as it is realistic. So it looks real, or at least really cool.


My first structure receiving treatment using my new tools will be a kit bash of a few Walthers Cornerstone Kits: The American Hardware Supply Kit, the River City Textiles Background Building Kit, and a few of the Peterson Tool Specialty kits.


One of the first structures I purchased for my layout and made in middle school/high school days was the Peterson Tool Specialty  Kit. I butterflied it to be a background kit for my modern era layout. Since first constructing it is has undergone a few "restructurings" as I learned how to build model kits. The first was an add-on for my Miller engineering signs as I needed some place for the animated signs control board to go so it would be out of the way and out of sight. I scratch built a small second story looking box and plopped it on top and installed the sign. The second rebuild was adding a whole host of supports and other styrene parts to make it holdup and resemble what an interior of a building would look like - with the exception that the interior is still all stark white. This time around, the third "restructuring" will result in basically a whole new building (that also reflects my change of era) based around what I already have.


Now the concept is that a manufacturing firm bought an old industry building (The American Hardware Supply and River City Textiles) and refurbished it. Also converting the outdoor loading dock into an indoor loading facility (the Peterson Tool Specialties). The era is everything post WWII in California, the roadname I run primarily is the Southern Pacific (as if they were still around today). Other prominent railroads include the Union Pacific, Seaboard, Amtrak, and BNSF. So like the equipment used on the layout, which ranges from F-units all the way to Gevo's and ACe's, I want the structures to span a long time period. I really like the look of the American Hardware Kit, probably because i see many of these types of structures were I live in the Bay Area. However most of them have now been converted into lofts or other residential and retail space. I am not going to model that here for the sole reason that lofts don't use rail traffic.


Currently I am working on painting the exterior of the American Hardware Supply kit (it will hopefully look a little like the picture on the box. As the box states, it comes molded in three colors: tan, black, and the clear windows. The first step for me was spray the brick color over the entire model, then mask off the brick sections in order to paint the concrete. Four hours of masking work yielded no more then fifty percent completion to taping off really small brick. Fortunately I find this time consuming task to be rather relaxing; I just hope that it will pay off in the results. I am hoping that everything looks great when I remove the blue painters tape that has been cut to size using some exacto knives. But alas there is only one way to find out I guess - trial and success (errors and failure are not options). So far I have spent over eight hours masking off the brick over the span of two evenings. Hopefully will turn out nifty.

 After I finish painting the exterior of the American Hardware Supply Building (which is still on the sprue's), I will move on to masking and painting the already built Peterson Tool Specialties structure.

This will have its own set of challenges. It is a rather long structure. I don't have the measurements off hand but it is definitely a few feet long - around four feet. Currently the roof and all other pieces have been removed to hopefully make the masking and painting process somewhat easier.